How to set up Hosted Web Apps with Windows Live Tiles
For those of you who have been keeping up with this blog, the Javascript container process is something I’ve been following closely for the past decade. Earlier in the year, Peter Kruger from Microsoft reached out asking if I could test their latest implementation, which we presented at //Build. It was an honor, and since then I’ve been advocating Microsoft and OpenFin’s implementation as my favorites.
In a nutshell: The Javascript container process let’s you take a JS website and make it feel native to the operating system – whether it’s iOS, Droid, or Windows. We’re going to cover the Windows Live Tile implementation here.
For those of you with Windows machines, tablets, or phones (okay Surface users and PCs) – you may see what Windows calls “Live tiles.” Windows 8 may have overdone it 😉 but Windows 10 nailed it. Tiles allow you to gain a snapshot of what the app is doing without having to open it. I always found this implemented on Android clumsy from a UI standpoint and the feature is mostly non-existent on iOS -with the exception of a Apple-apps like weather and the clock. I use an iPhone for the record.
But – Microsoft nailed it IMO with the perfect amount of structure and dynamic content. Whereas Android has widgets which are all sorts of shapes, Microsoft forces structure and lets you “snap” together tiles.
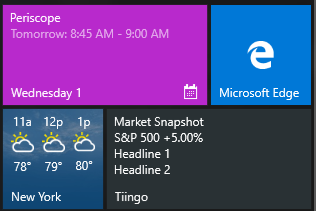
E.g.
Notice the Tiingo one? Yeah we like it it too 🙂
We’re going to cover how we got these going in our pure-Javascript implementation. It didn’t require any native coding which was nice. It turns out if you’re using Hosted Web Apps, which let you convert your Javascript web app into Windows app, Microsoft injects a Windows library that you can use to interact with Windows.
This GitHub page does a good overview, but we’re going to go a little more in-depth. Still a good read-through: https://microsoftedge.github.io/WebAppsDocs/en-US/win10/HWAfeatures.htm
Step 1 – Download the source code/generate the manifest
You need to generate source code, or a manifest file for this to work. If you don’t know what it is (like me initially), you can use App Studio which has a wizard and takes care of this for you. Visit here: http://appstudio.windows.com/en-us, make an account, and then created a “Hosted Web App” via this URL: http://appstudio.windows.com/projects/create
When you’re done with the wizard, click “Generate” and download the Source code.

Once you the source code, you can open it up via Visual Studio. You can download the Community edition for $0 here: https://www.visualstudio.com/en-us/products/visual-studio-community-vs.aspx
Step 2 – Choose a Template
Microsoft has pre-generated templates that you can “fill-in.” In reality, these are XML templates where you can change the content and then update it. So we’re going to choose a template, populate it with data, and then send the notification update to the Windows Notification library
Find a template that you like. We’re going to change the content in them to present the data that we want. You can see the catalog here: https://msdn.microsoft.com/en-us/library/hh761491.aspx
For Tiingo, we went with tileWide310x150Text05 . Keep track of this “identifier” code as we will need it in our javascript code.
I like the idea of clean, text and for financial data images are not as necessary. Maybe later we will include them for news stories, but first I wanted to include text.
Once you choose the template, you can scroll down and see the XML. For tileWide310x150Text05 it looked like (taken from MSFT’s website):
<tile>
  <visual>
    <binding template="TileWideText05">
      <text id="1">Text Field 1</text>
      <text id="2">Text Field 2</text>
      <text id="3">Text Field 3</text>
      <text id="4">Text Field 4</text>
      <text id="5">Text Field 5</text>
    </binding>
  </visual>
</tile>

<tile>
  <visual version="2">
    <binding template="TileWide310x150Text05" fallback="TileWideText05">
      <text id="1">Text Field 1</text>
      <text id="2">Text Field 2</text>
      <text id="3">Text Field 3</text>
      <text id="4">Text Field 4</text>
      <text id="5">Text Field 5</text>
    </binding>
  </visual>
</tile>
Step 3 – Update the tile in your JS code
Next we have to tell Windows when to update the data and what to do.
We used this snippet, check the comments to see what each line means:
//See if the Windows namespace is available (injected by Windows for HWAs)
if (typeof Windows !== 'undefined' && typeof Windows.UI !== 'undefined' &&
typeof Windows.UI.Notifications !== 'undefined') {

     //setting dummy market data
     var marketData = {spy : {returns : .05}, newsLinks: [{title: "Headline 1"}, {title: "Headline 2"} ]};
     //Get the Windows UI Notifications
     var windowsNotifications = Windows.UI.Notifications;

     //Load in the template, which will contain the XML we can modify
     var tileTemplate = windowsNotifications.TileTemplateType.tileWide310x150Text05;
     var tileXML = windowsNotifications.TileUpdateManager.getTemplateContent(tileTemplate);

     //We now get all the text elements and append text nodes
     var tileText = tileXML.getElementsByTagName('text');
     //First line will be a header
     tileText[0].appendChild(tileXML.createTextNode("Market Snapshot"));

     //Next we get the returns and append a "+" sign if the return is >0. For negative numbers, JS defaults to appending a "-"
     if(marketData.spy.returns > 0)
          tileText[1].appendChild(tileXML.createTextNode("S&P 500 +" + (marketData.spy.returns * 100).toFixed(2).toString() + "%"));
     else
          tileText[1].appendChild(tileXML.createTextNode("S&P 500 " + (marketData.spy.returns * 100).toFixed(2).toString() + "%"));

     //Next we add the news headlines
     tileText[2].appendChild(tileXML.createTextNode(marketData.newsLinks[0].title));
     tileText[3].appendChild(tileXML.createTextNode(marketData.newsLinks[1].title));

     //Create the TileNotification, passing our modified XML template and then send the update command
     var tileNotification = new windowsNotifications.TileNotification(tileXML);
     var tileUpdater = windowsNotifications.TileUpdateManager.createTileUpdaterForApplication().update(tileNotification);
 }
Since we are using Angular, we wrapped the initial call in a $timeout() and then set an $interval to get the marketData JSON object from our back-end every 30 seconds.
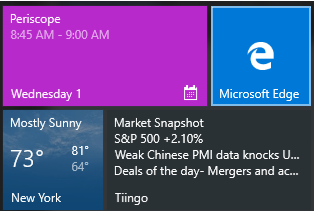
Step 4 – Test the app by running it in Visual Studio, pin the app to your start menu, and voila!
Beautiful!